Sunday, November 15, 2009

Summary


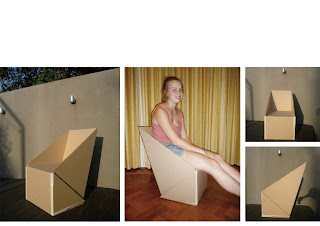
I was very nervous and to be honest quite unsure as to wether my final design would work. As my chair basically used up the entire piece of xanita, this meant that I was unable to get it laser cut at the workshop but instead would have to cut it myself. To try and make life a little easier I printed out my autocad plan on 25 A3 pages and stuck them onto the xanita with masking tape. Having my lines to guide me I started to cut. Having been cutting on my hands and knees for the past 6hrs I was tired, sore and running out of patience. Wether it was a mix between this, the fact that I just changed blades or that I had left the xanita in the glaring sun for a good part of the day, I am unsure, but as I was doing some of my 45degree cuts as well as cutting through to the outer layer the material ripped- and well that was that. I was quite upset, as I had not ONCE cut through the material on my practice piece. In the end I had to use masking tape to hold some of the edges together. The join, which was meant to bolt down the armrest, also snapped off at the fold, so I don’t advise leaning back! All in all I was actually quite happy with my design, as I believe that with another piece of xanita my chair would be “hole proof” and do it’s job more proficiently.

Branding and Context

I believe that my final design meets the needs of the user as it complies with it’s initial purpose for being an outdoor chair where patrons can relax for a moderate period of time. As shown below the low seating allows the legs to be spread out, essentially taking the weight off the feet. The slanted backrest gives support to the lower back and allows the body to comfortably lean back. The small size of the chair means that it can be easily moved around and does not take up large quantities of space. The text on the side of the chair is a simple but effective form of branding to advertise the event.

Chair Assemble

Chair Plan and Elevations

Saturday, November 14, 2009

Final Template


First Xanita Model


It was now time for the xanita board! Having received my first piece in class I decided to get it laser cut in two pieces as the maximum surface area that could be cut in the uni workshop was 1200mm x 1500mm. I decided to cut it along the fold line of where the backrest and arms joined the base of the chair. As I didn’t look at the exact measurements on cad before cutting it, but instead going off my print out in my journal my cut was 80mm off and therefore the backrest was not at its full length- which wasn’t really design issue, it just looked incorrect aesthetically. Once it was cut I suddenly realized that I really hadn’t considered the thickness of the xanita at all and that I had some design problems that needed to be consolidated.

1. As I began to do my 45 degree cuts and folds it occurred to me that many of my lines were off and that a lot of my measurements needed to be altered by about 10-20mm.

2. A problem that soon arose was that the armrests needed to fold into the base of the chair so that it sat flush across the front. In order for this to happen the xanita needed to be cut back to its outer layer so that the arms could slot in. Though as this was a corner piece there was a high chance that the material would rip at the seams.

3. The biggest problem was that I hadn’t really considered the mechanics behind the backrest. Its only connection was at the base of the chair, which meant that when pressure was put on it there was nothing to stop it from falling back. Unsure as to how I had missed this crucial detail the first time, I started to devise locking system out of xanita scraps to work out how this problem could be solved. Having designed two 50mm wide tabs that folded inwards and joined at the centre of the chair I was now ready to make my final chair.


Wednesday, November 4, 2009

Concept Refinement


Having made my second 1:1 model in class I was finally satisfied with my design. Though when I sat on it the following day to photograph it I realised that my design had some flaws as it struggled to hold my weight. Although the material was only 2mm thick (which was the main reason behind it’s fragile structure) I could also notice some problems with the locking system. The detachable slot was only 112.5mm in width, which weakened the lock when pressure was put on the seat. What I really needed was a slot that was 300mm wide so that it reached from the seat to the floor. Though in order to do this I needed to make some alterations to my design, as I did not have enough card left to make these changes. In the end I decreased the width of the “fold under” flaps from 75mm to 30mm and created an “L shape” which hooked under and into the seat flaps. Small alterations were also made to the dimensions of the chair arms and seat. After testing the alterations on a 1:5 paper model I then went on to make a 1:1 model from mount board. In conclusion I am very happy with my final design and am now ready to test it on the xanita board!!!


Evaluation


I have decided to evaluate my progress over the past 6weeks to see how my design has progressed over this short period of time. The photograph illustrates my three 1:1 chairs from week 6, week 10 and week 12. I have also sketched the locking systems for each chair to help demonstrate the evolution of my design.

The week 6 chair shows a relatively pleasing aesthetic from the photograph, but from the sketch it is noticeable that there is no locking system to support the seat and the only reason the chair could hold my weight is from the excessive amount of material used that was double and sometimes triple folded to create a fairly sturdy structure.

The week 10 design was cut from a 1800mm x 1200m piece of cardboard and therefore gives a more accurate idea of scale. As a result in comparison to my design in week 6 it is 100mm lower to the ground. From looking at the sketch it is apparent that a locking system has been derived, though the solitary triangle does not give the seat enough support to withhold 150kg.

The current design (week 12) aesthetically is almost identical to the week 10 design, except for the leaning backrest that sits at an approximate angle of 60degrees. The week 12 sketch shows a vast improvement in the structural support of the chair with the use of a sturdy gridlock.

Although I am very pleased with my improvement over the past few weeks I still believe that I am able to derive a more thorough locking system that supports the seat right through to the ground. I am therefore going to further refine my concept to create one more 1:1 before I begin with using the xanita board.

Tuesday, November 3, 2009

New Concept


After many hours and MANY cardboard 1:5 models I have come up with a new concept, one that I am much more satisfied with. This design still basically follows the same aesthetics as the previous but has a slanted backrest, which allows the body to be in a more relaxed and comfortable position. I have also generated a much more effective locking system to support the seat, as I quickly learnt after falling through the seat of my last 1:1 model, that my previous seat structure was inadequate.