Wednesday, November 4, 2009

Evaluation


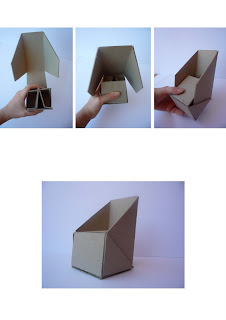
I have decided to evaluate my progress over the past 6weeks to see how my design has progressed over this short period of time. The photograph illustrates my three 1:1 chairs from week 6, week 10 and week 12. I have also sketched the locking systems for each chair to help demonstrate the evolution of my design.

The week 6 chair shows a relatively pleasing aesthetic from the photograph, but from the sketch it is noticeable that there is no locking system to support the seat and the only reason the chair could hold my weight is from the excessive amount of material used that was double and sometimes triple folded to create a fairly sturdy structure.

The week 10 design was cut from a 1800mm x 1200m piece of cardboard and therefore gives a more accurate idea of scale. As a result in comparison to my design in week 6 it is 100mm lower to the ground. From looking at the sketch it is apparent that a locking system has been derived, though the solitary triangle does not give the seat enough support to withhold 150kg.

The current design (week 12) aesthetically is almost identical to the week 10 design, except for the leaning backrest that sits at an approximate angle of 60degrees. The week 12 sketch shows a vast improvement in the structural support of the chair with the use of a sturdy gridlock.

Although I am very pleased with my improvement over the past few weeks I still believe that I am able to derive a more thorough locking system that supports the seat right through to the ground. I am therefore going to further refine my concept to create one more 1:1 before I begin with using the xanita board.

Tuesday, November 3, 2009

New Concept


After many hours and MANY cardboard 1:5 models I have come up with a new concept, one that I am much more satisfied with. This design still basically follows the same aesthetics as the previous but has a slanted backrest, which allows the body to be in a more relaxed and comfortable position. I have also generated a much more effective locking system to support the seat, as I quickly learnt after falling through the seat of my last 1:1 model, that my previous seat structure was inadequate.

Sunday, October 25, 2009

Further Development

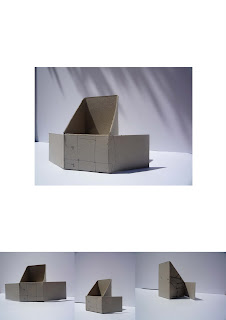
This concept has starting to initiate a structural support for the seat. I have created two slots in the base of the chair so that the two folded sides of the seat have something to insert into, though as the board is only 2mm thick this idea did not prove to be very successful. Though the slotting of the back rest into the seat (which can be seen on the side view below), is effective both visually and functionally.


Concept Development

Now that I am at the stage of concept development I have moved onto using 2mm mount board at a 1:5 scale. In comparison to the paper, the cardboard is not as flexible and at a 1:5 scale it is more truthful to the characteristics of the xanita board.

This design follows on from my “beach chair” in concept 3. As I have been having some trouble initiating my design I have decided to take a look back at the chair I designed in week 6 to get some inspiration. Though unlike my last design, this time I must be much more efficient with my use of material as I am restricted to a 1220mm x 1830mm sheet of xanita.

From this design I was able to come up with a general aesthetic for my chair, which includes a 300mm high seat with a 400mm high backrest. Though the structure of the chair is still in the stages of development as the seat has no form of support and therefore a locking system still needs to be devised.


Research: Beach Chairs


Chair One:

I like this lounge as it is low to the ground, has a low back rest and has an outstretched seat which allows the person to stretch out their legs. The lounge has been cleverly designed so that it can be folded up and carried around. If I could incorporate this into my chair, it would be a great form of branding. The disadvantage for this chair is that I am restricted to a 1220mm x 1830mm piece of xanita board, which means that the prospect of making a lounge chair is almost impossible.

Chair Two:

This chair has low seating with an adjustable high backrest. When propelled up (as shown in the picture) the person is sitting almost directly upright. The armrests are practical for when the person is sitting upright, otherwise are simply used to function the adjustable backrest. Once again the restriction of material means that a high backrest may not be suitable, though the arm rests could be something I could incorporate into my design.

Chair Three:

This is another beach chair with a more simplified design. The low to the ground seating allows the person to outstretch their legs in a comfortable manner and the low backrest creates a somewhat lounge position. This chair also complies with the material restrictions.